Is it a new series? You bet your sweet bippy it is.
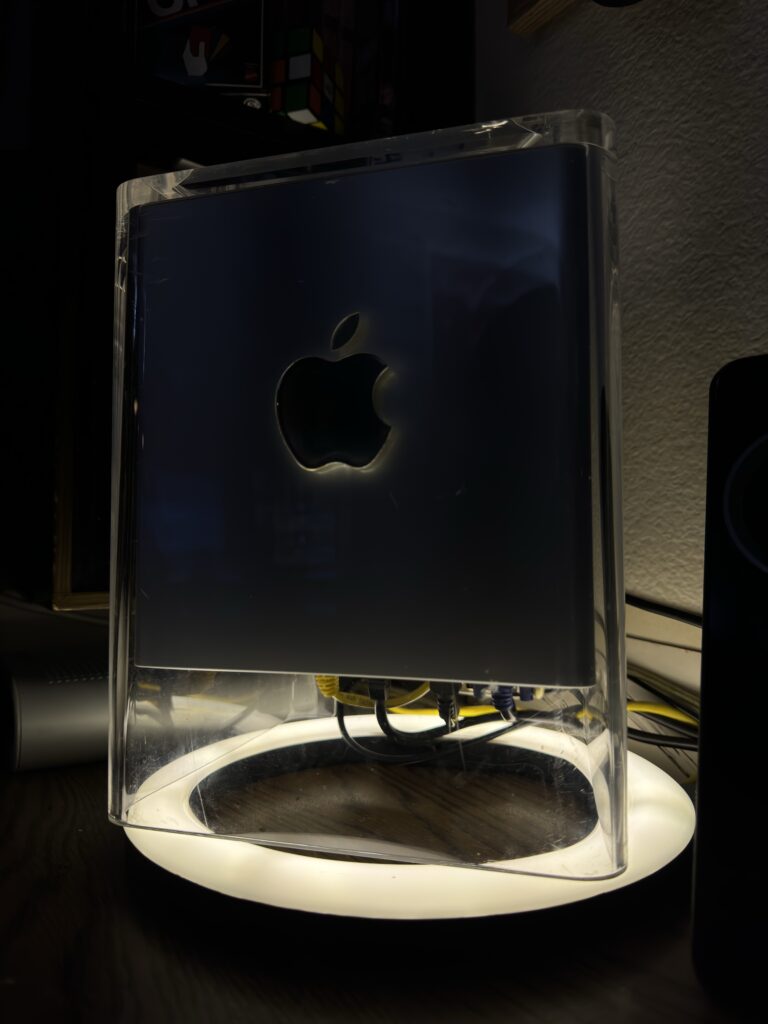
As part of a trade with the awesome Stephen Arsenault, I have in my possession a Power Mac G4 Cube. I got the itch to get one of these back at VCF West 2023, when my good friend and coexhibitor brought his and we had to poke around with it on the floor because it was misbehaving. Something about cramming stupid amounts of power in a machine ultimately not meant to be that powerful just seemed alluring to me. I put out feelers for a Cube, and sure enough…Stephen had one he was willing to hand me in trade for something I had. Trade completed, Cube in hand, I got to thinking what I could do with this thing within the limits I had. (I don’t have Action Retro-level money and resources, so I have to make do with cheap.)
Luckily, one part of this was already done for me: With the Cube I got the infamous GeForce 6200 WANG card (I am not kidding about the name, by the way). However, this was not ideal, either. While the 6200 is a beast of a card and works amazingly under OS X 10.4, that (and 10.5) is all it works with. Any older and the card just turns into a dumb framebuffer incapable of providing any acceleration whatsoever due to lack of driver support. Considering my main area of focus is Mac OS 8.6-9.x, this was kind of a problem. Sure, some of the games I played got OS X versions, but some (Unreal Tournament, for example) refused to run in 10.4. Others (original Unreal) never got updated. Most games would run with significant glitching and horrible performance if trying to play them by way of the Classic Environment.
But hark, what’s this? A Radeon 7500 was also included! Which unfortunately is borked in some way because it has weird artifacts in 3D games. Sigh. Can’t ever be that easy, could it?
I just opted to–for now–make this an OS X-only machine, as I wasn’t about to look a gift horse in the mouth.
But First, Storage
The Cube came to me with a 16GB SSD of some description in it. Good enough for light things, but given the optical drive is temporarily out of commission (needs new belts) I need to be able to install full games AND their ISOs if needed. 16GB in this case wasn’t going to be enough. I anticipated to find one of those IDE-SATA bridge boards installed, but to my surprise I actually found a DOM (disk on module). Those are pretty cool, but for this machine I need more. I decided to poke around for an IDE-SATA bridge and found one in the StarTech IDE2SAT2. There are plenty of no-name adapters, but for something as picky as the Cube I wanted to go name brand.
For a SSD I had a Silicon Power A55 (ha) hanging around. Since the Cube can’t address more than 128GB anyway, the 128GB A55 was perfectly adequate. However, there was a slight issue: When the IDE-SATA bridge arrived, it was slightly too big to fit in the opening where the hard drive would normally go. I got around this by actually removing the A55’s plastic chassis (because most modern, lower-capacity SSDs only use half the actual footprint of a 2.5″ SATA drive, the rest is plastic) and wrapping the bare PCB in kapton tape, angling it so it rests its edge against the CPU heatsink. This let it sit in the Cube just enough to clear the bracket that sits behind it.
At the same time, I opted to install a fan. There’s a spot for a base fan at the bottom, however I had no fans on hand that would fit. So I opted to grab a fan that would fit in the space left over from the hard drive not being present and aimed it at the CPU heatsink to force air over it. This worked…for a bit, at least.
The optical drive was another consideration while I was messing about: I had heard by boiling the belt and cleaning the rollers you could possibly get it working again for a bit, but neither of these things worked. The optical drive works insofar as reading discs, but ejecting them is a pain. (And the Cube needs to rest on its side for it to eject properly.)
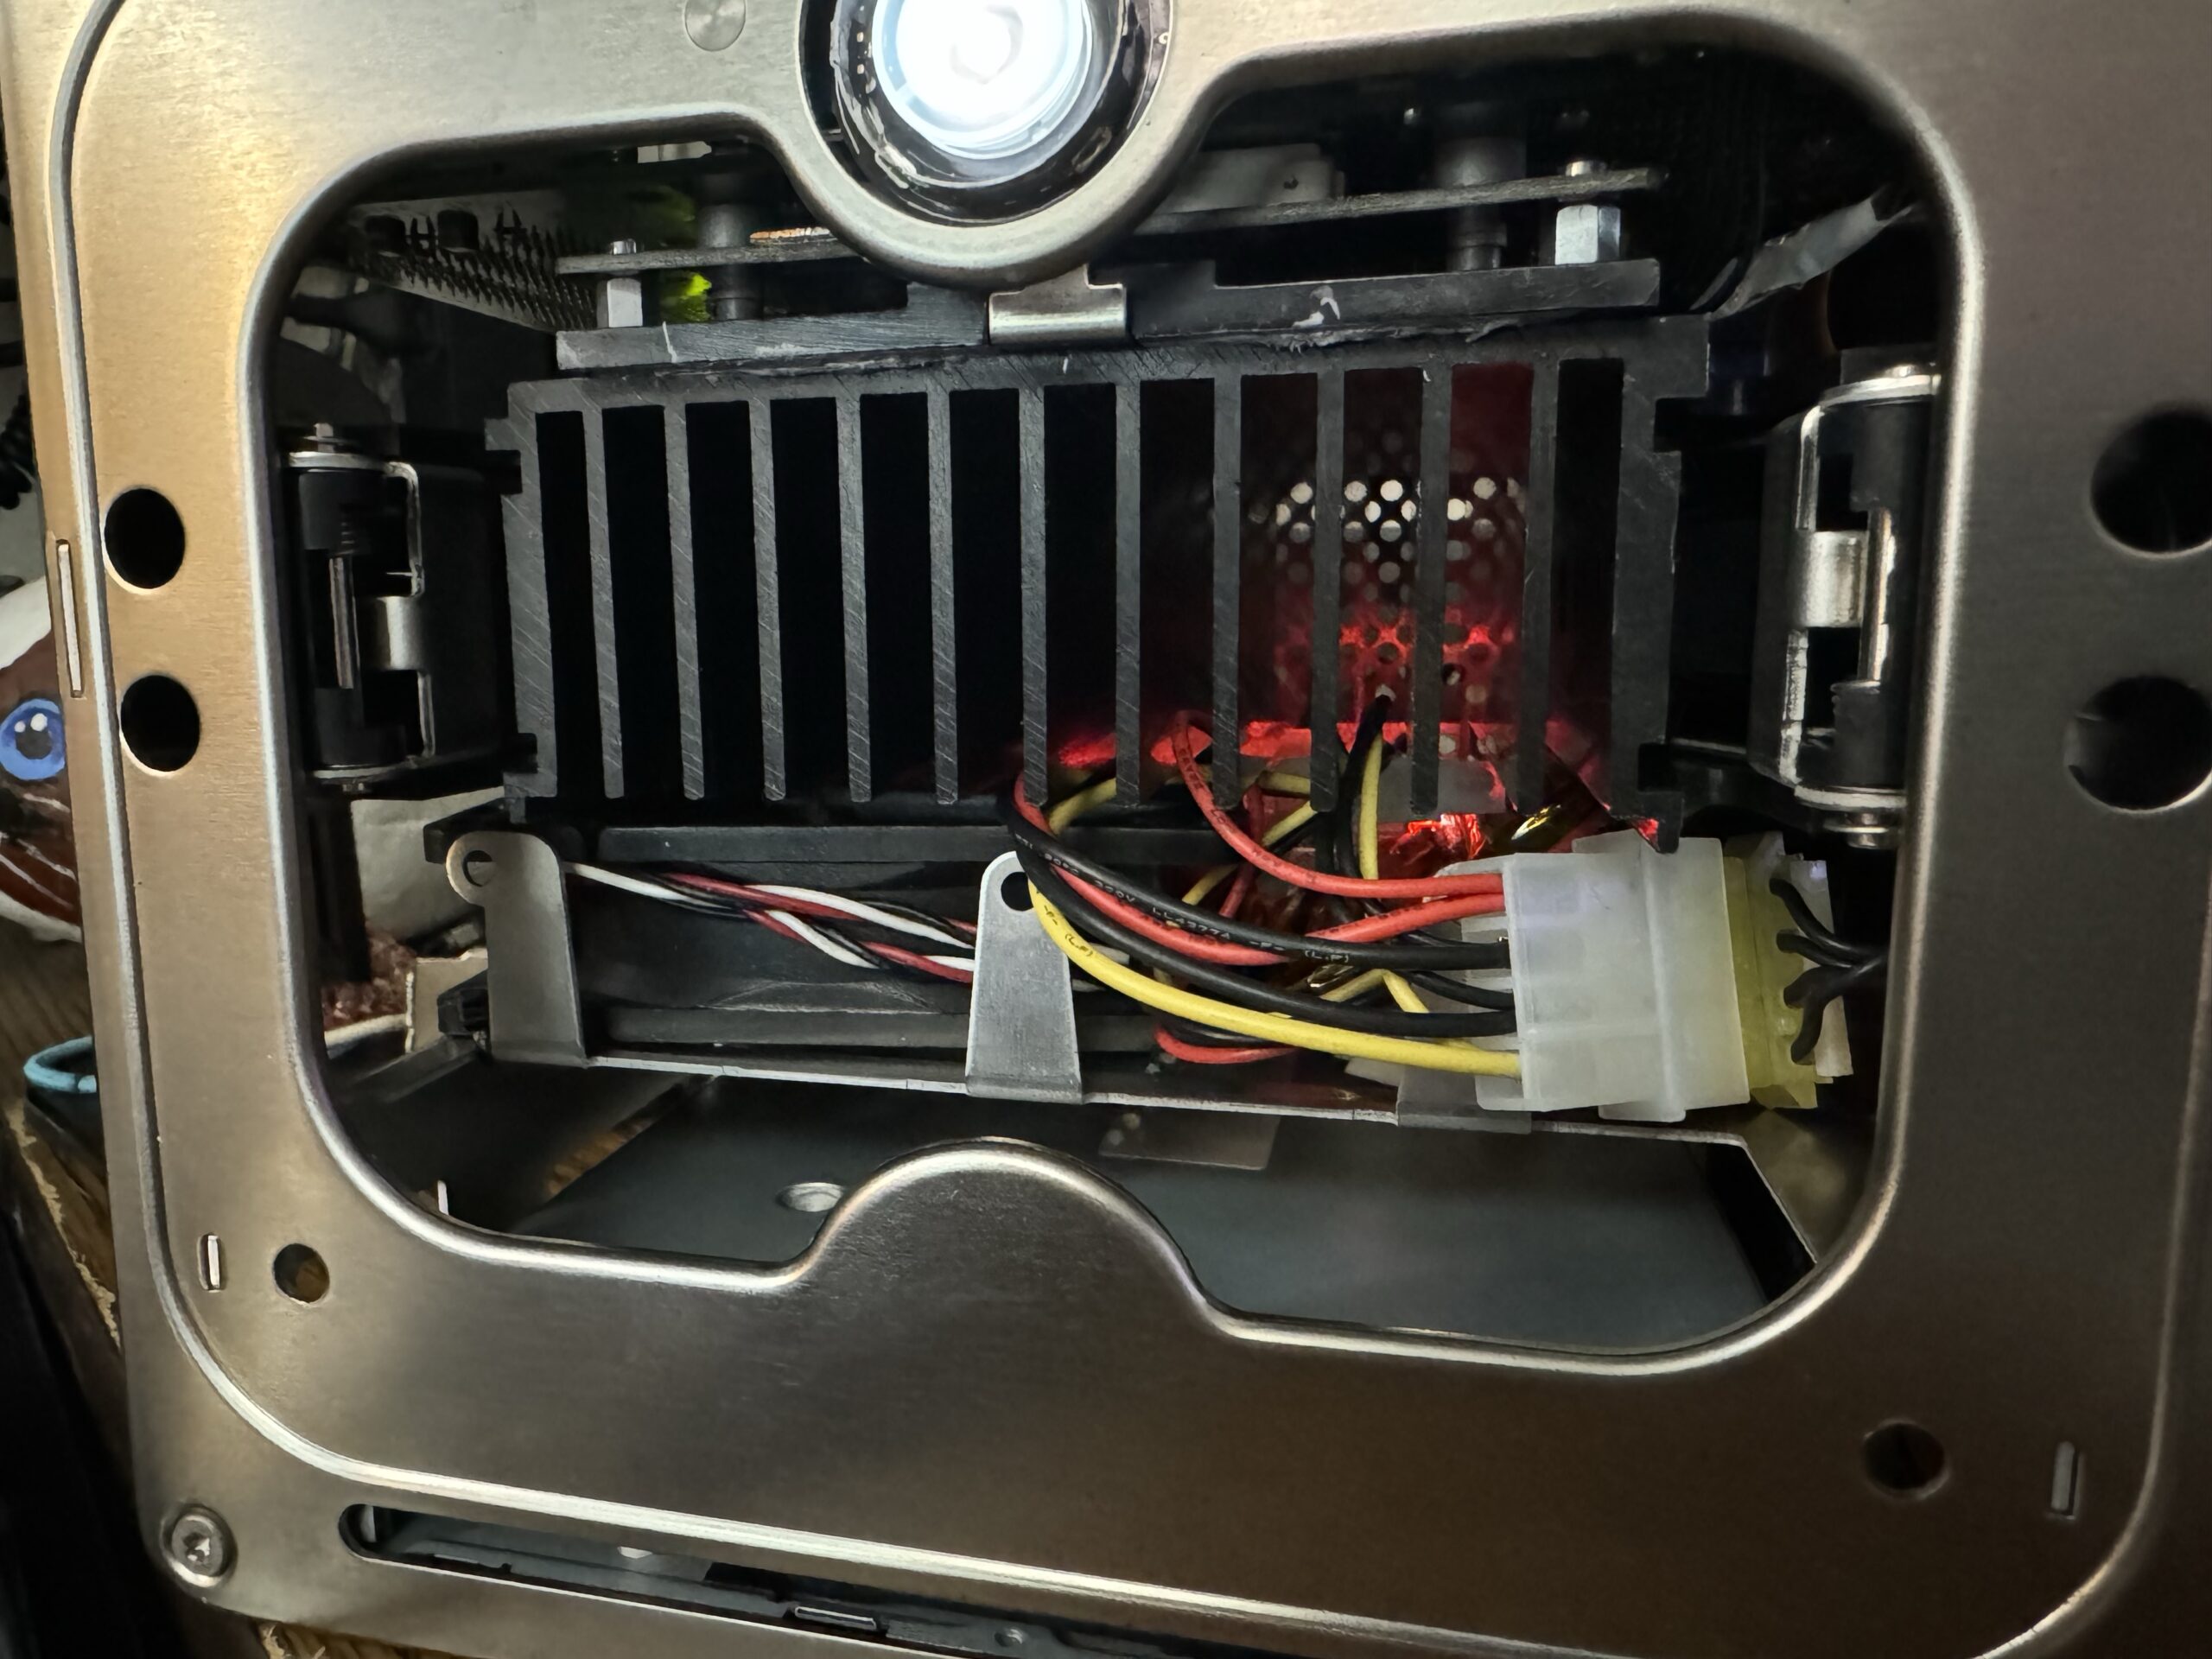
The VRM and CPU
Stock, my Cube came with a 400MHz PowerPC G4, and while this was adequate, overkill is the name of the game here and I wanted to stuff this thing with something ridiculous. Thankfully, ridiculousness wasn’t far away: From the amazing Garth Beagle (and some time before this project took place) I had acquired a Digital Audio G4 with a 1.4GHz Sonnet Encore in it, and since that machine was deciding to suddenly be on its worst behavior (it was supposed to go to VCF West 2023 but fell on its face a few weeks before), I decided it was going to give up its accelerator for the greater good.
Googling suggested the accelerator would indeed work, so I got to pulling the Cube apart to get to the CPU. This is a very, very involved process. Not too hard, but just…time consuming. If you’re planning to install a base fan I would very much recommend holding off on doing a CPU swap until you’re ready to put the base fan in, as two of the mounting holes for the base fan are under the logic board. Which has to come out to do the CPU swap.
I, however, was impatient, and at the time didn’t care much about installing a base fan since that crudely-installed fan was doing just fine. This would later bite me in the ass.
The CPU, heat spreader, and heat sink are all secured together with what I’m assuming is a thin graphite layer/pad. I didn’t trust any of this with the new, more powerful CPU going in, so I opted to just pull it all off with alcohol and replace it with a healthy gob of spread-out thermal paste. Separating the layers can be kind of tedious, especially if this surgery hasn’t been done before. But with some light prying, the metal layers should come apart, and you should be able to unscrew and remove the CPU/heat spreader plate.
Given that the Sonnet card I was putting in wasn’t explicitly meant for a Cube, it did have a fan header jutting out from one side that I opted to cover with more kapton tape to prevent it from bridging on anything. Didn’t get in the way otherwise, much to my relief.
After going through the time-consuming process of putting it all back together, I plugged it in, expected the VRM to immediately blow up, but was greeted with a successful boot. Looking at System Profiler, I was delighted to see the full 1.4GHz was reported! Given this accelerator had come out of a G4 with a 133MHz system bus, I expected some speed loss due to the Cube having a 100MHz bus. Seems the Sonnet accelerator intelligently adjusts itself to whatever system you put it in. That’s cool.
I know the VRM needed to be dealt with, as when you start throwing upgrades at this poor system that it was never intended to have it puts a LOT of stress on the MOSFETs. However, as I mentioned before, this needed to be kept cheap, and the only person making replacement VRMs for the Cubes wants upwards of $200 for them, not to mention they take months to arrive.
(I had also consulted with Dave’s Vintage Apple Tech seeing as he walked a very similar path and it seemed like the stock VRM was just fine for him short term with the 1.4GHz upgrade. He would later go on to put a 2.1GHz card in his Cube, which definitely necessitated a better VRM.)
Lucky for us, there are two outs: The first is that Apple actually underequipped the G4’s VRM, because if you look at the module itself where the MOSFETs are, there are spaces for two additional MOSFETs! So we could grab two more of similar spec and just throw them on there and we should be good, right?
Nah. We can do better. On the advice of dosdude1, he suggested some replacement MOSFETs that are beefier and just drop in with a bit of SMD rework. Nothing I can’t handle. I’ve got a set of 8 on order from Mouser, and I’ll either update this post when I’ve completed the work, or write it into the next part.
Another good idea for the VRM is heatsinking it. I picked up a pack of small heatsinks with preapplied thermal adhesive for less than $10 and stuck them on the stock MOSFETs to keep them cool until I can replace them. Just by feeling them with my fingers I can tell they’re putting in work as they get VERY toasty.
One small thing before we get to the next part: Seeing as the Cube lacks onboard audio, I needed a solution for this, too. Thankfully Mac OS (even OS 9) supports USB audio devices, so I was able to pick up a cheap Sabrent-branded dongle and just use that for audio out and it works a treat. I’ve used the Cube to play audio from my server and it sounds perfectly fine. (Though I’ve tried more overkill products–specifically the Schiit Fulla 2–and those worked just fine in OS 9. So the sky’s the limit with USB audio devices, it would seem!)
GPUs, again? (And thermals, yay!)
When I first took on this project I figured this machine would remain an OS X machine forever as any obtainable OS 9-capable card would be a massive downgrade from the GeForce 6200.
There remained a single, really good OS 9 card that would fit in the Cube, and without trouble so I’m told: The GeForce 3. This seemed like the dream card, but as you’d expect, they’re exceptionally rare and hard to find, especially the Apple-spec ones with ADC. I never, ever, EVER expected to be able to get one for my Cube.
As I’m sure you’ve already guessed, I did, in fact, manage to score a real deal GeForce 3 for my Cube. To say I got insanely lucky and that the person who handed it to me is insanely generous is an understatement. If you’re reading this, Dave (a different Dave from the one previously mentioned, to avoid confusion), I owe you a big one down the line.
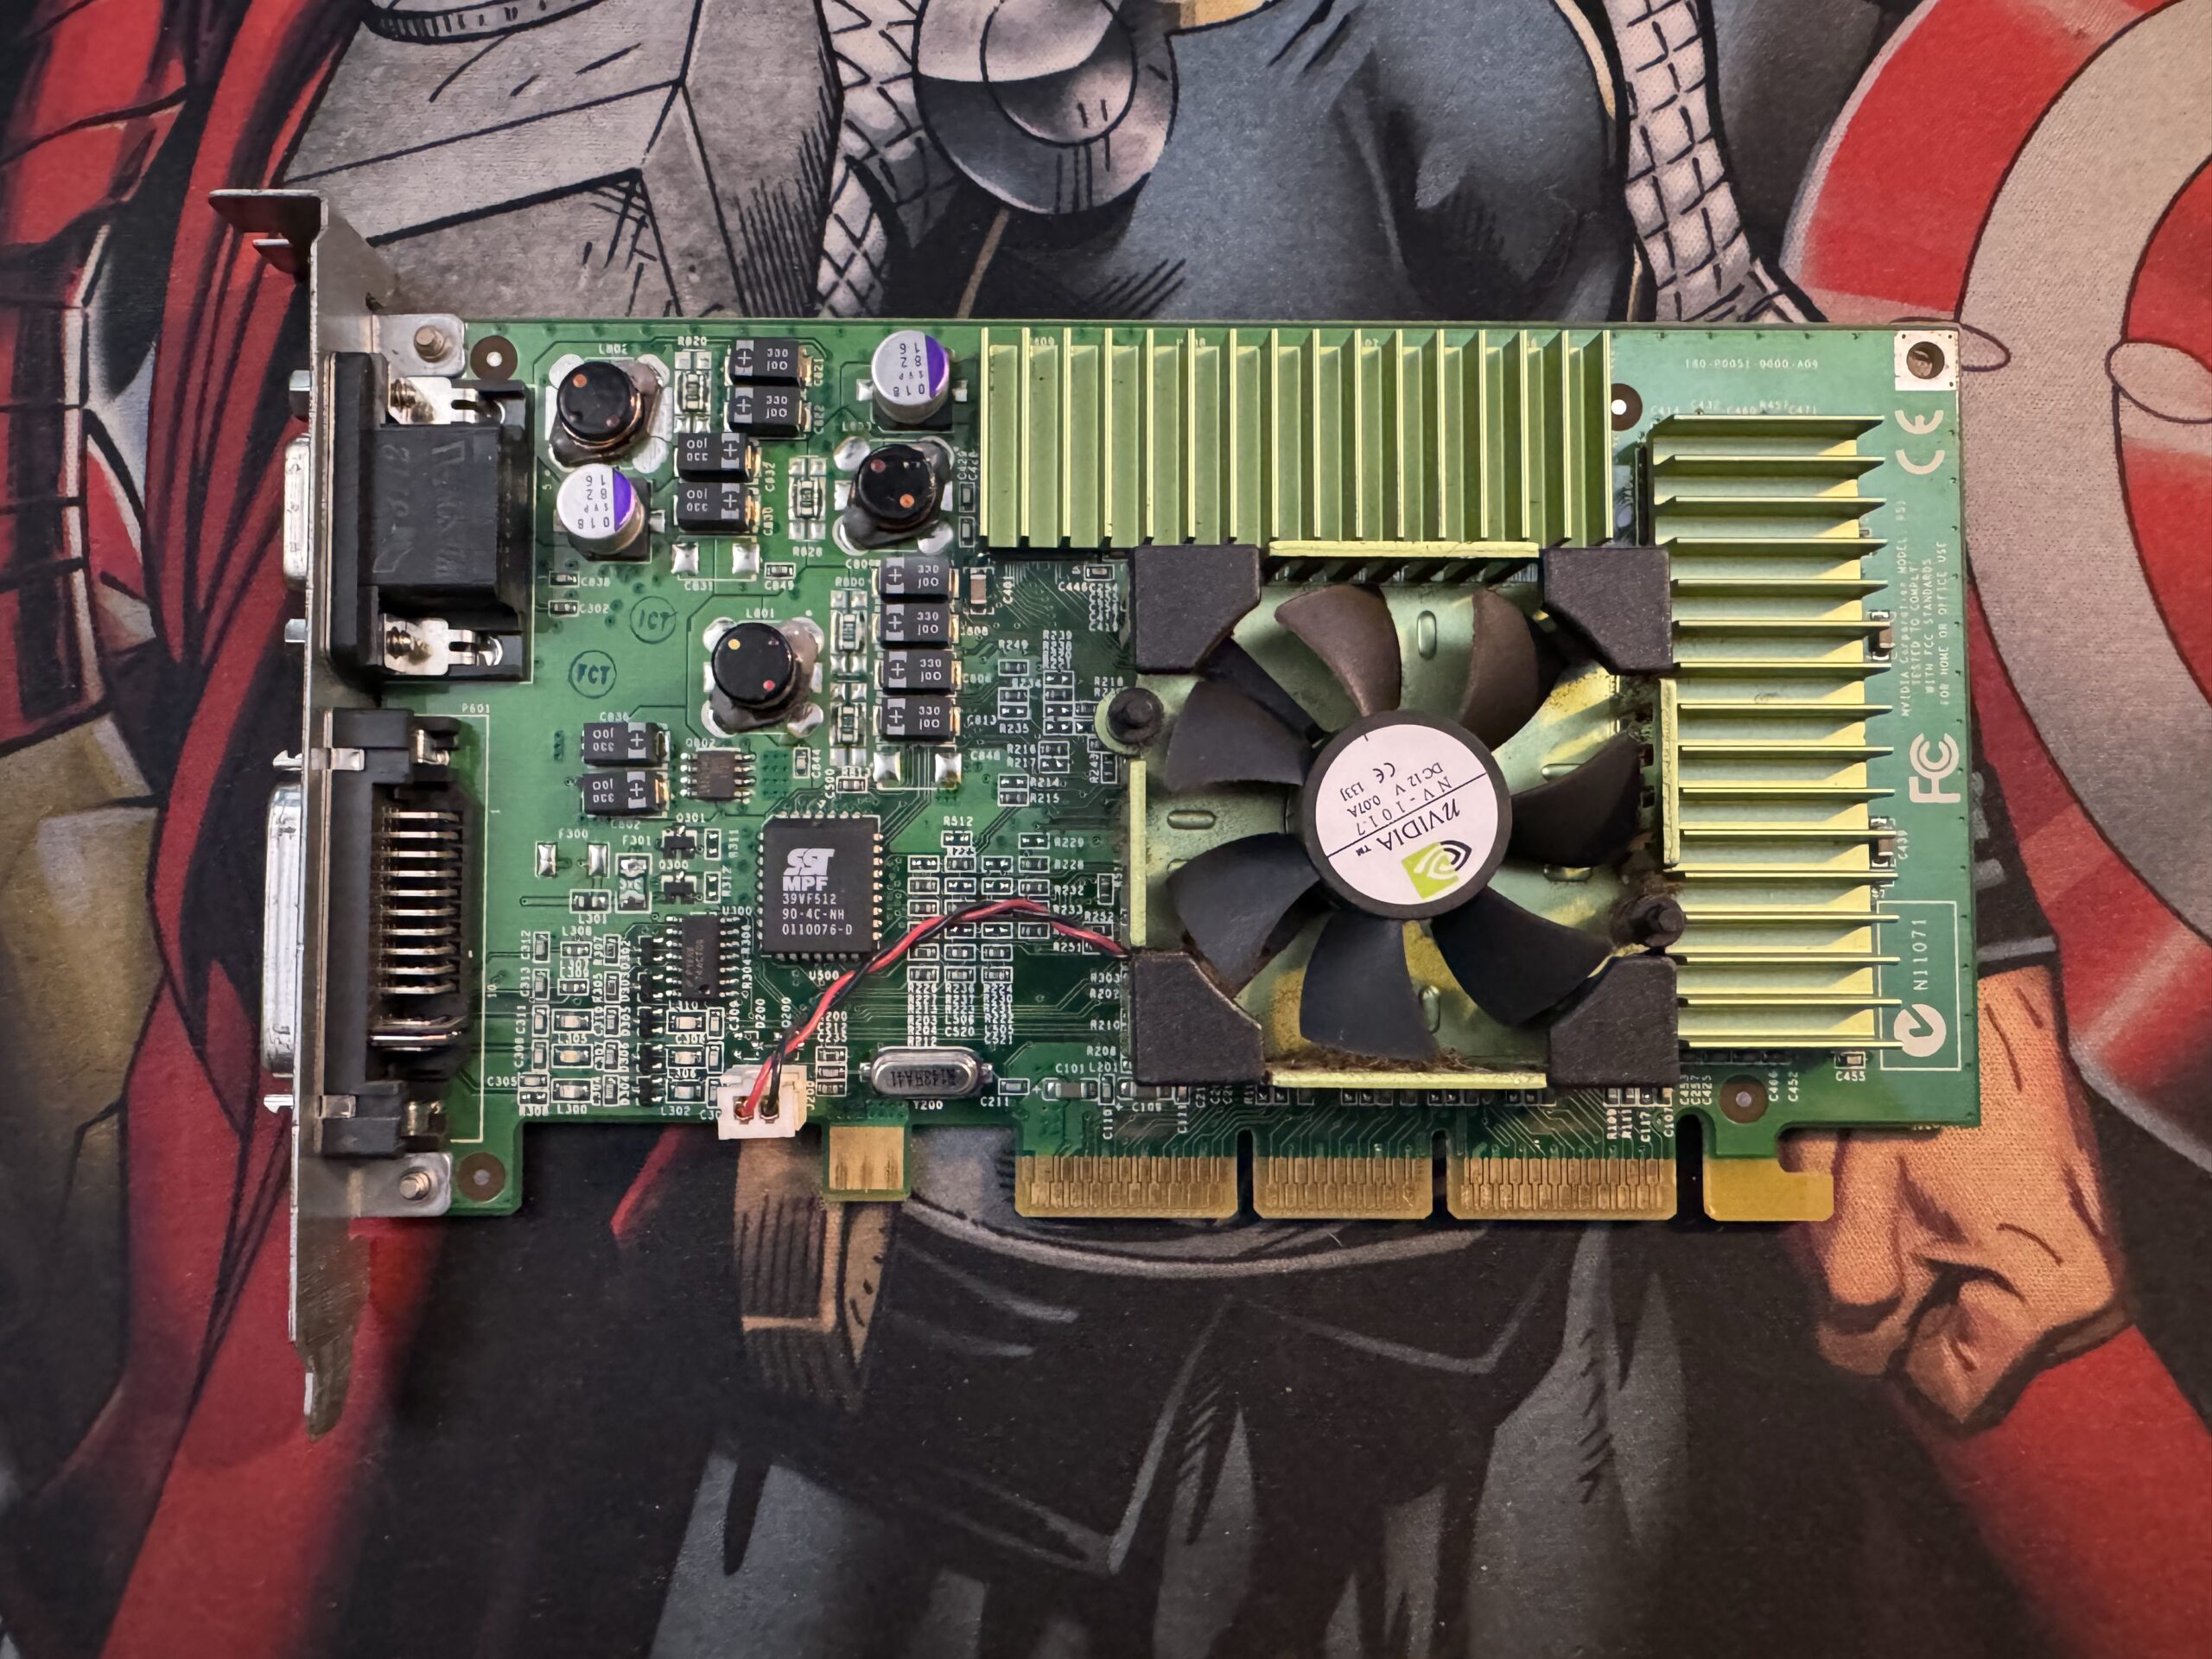
So it goes, said GeForce 3 was found inside of a trashed Sawtooth G4, and the rest of the machine wasn’t worth saving. So he parted it out and asked if I wanted the GeForce 3 on the condition the Cube shows at VCF West 2024. Oh, it absolutely, absolutely will. (And let’s be honest, the reason I’m going down this long journey is to get this Cube VCF-ready. That’s the end goal.)
Now, due to a seeming lack of documentation (card is rare, so this is to be expected, and the Cube never did numbers for sales, but I’m also not ruling out that my search skills may have failed me here either) I had expected the GF3 would be just a drop-in-and-go card. It (kind of) was! The card fit perfectly into the Cube, even finally reaching out to the GPU standoff that went unused with the 6200 due to how small it was. This was nice as because I lacked the faceplate for the card, it added some much needed stability that wasn’t there with the 6200.
I put the Cube back together, powered it on, and it booted first shot. Yes. YES. YES.
I booted it back into OS 9, and as expected this thing was stupid fast now. Moving Finder windows was buttery smooth whereas before it had to take a second to redraw them due to lack of video acceleration. Games (Quake 3 in this case) ran buttery smooth. I now had my ultimate OS 9 machine.
Except…when I left it playing some music with Audion, I noticed this faint smell of really hot electronics from across the room. I thought it was something on my desk, until I followed the scent trail over to the table where the Cube was sitting, happily belting out some VNV Nation. The smell was coming from the GPU compartment. It was the smell that signaled bad things were afoot.
Powered down the Cube post haste, pulled the acrylic cover off and the GF3’s heatsinks were burning hot. As in will burn skin hot. The whole thing smelled like a PCB does when you get it really hot, almost like you’re trying to reflow something on the board with a hot air station. Yikes.
I let it cool down, and have since spent hours upon hours going back to the drawing board trying to figure out what I can do for airflow. You remember where I said there was little documentation? Yeah, googling around for answers on this yielded almost nothing. The few I saw were either people using it in their stock chassis Cube, or people who were lucky enough to get that oddball expanded Cube chassis that a third party made way back. Even searching the 68kmla forums didn’t turn up much. I made a post on Bluesky and Mastodon, and even on the Tinker Different forums, but thus far, not much has been said. Plenty of boosts, but no solid advice.
The Plan, Maybe
The first part of the plan is to do the base fan right. I said this came back to bite me in the ass. Here it is.
Because the current fan in the Cube just blows air into the heatsink, it isn’t really trying to force air out of the chassis like a base fan would. It’s just blowing it against the heatsink and letting the air go its own way. My theory is that some of the air is getting forced out of the bottom, and this air is being kicked into the GPU compartment and thus not helping thermals. By blowing the air where it needs to go (up and out the top vent) the hope is that it’ll take some thermal stress off the core of the Cube, and thus free up a little thermal headroom in the GPU compartment.
Once the base fan is handled, the other plan is to add some small blower fans (with thanks to Tech Ambrosia for the advice on this!) to the GPU compartment to force air through that, too. The problem with the GF3’s main cooler (which has a fan) is that it tries to pull in air from directly above (or below, if the card is mounted upside down as is usual in tower cases) itself. Due to the tight clearance in the Cube, the fan is almost pressed up against the metal chassis once the case is closed up. Hypothesis is that this causes the fan to struggle to pull in air and keep the card cool.
Thus, hopefully forcing through some air from the side (and with smaller fans that have more clearance) will allow the card to run cooler. In the interest of science I did put a temp probe on the GF3, closed the case up, and ran Unreal for almost a half hour and the temperature on the heatsink itself hit 78c before I decided to call it off. I’ve been told the card is rated to go up to 90c, but…maybe I’m just paranoid, but I feel running it so close to its thermal limit like that is a bad idea. I dunno.
The last two options are the ones I’m dreading, if they need to be taken: I could fashion a custom heatsink that could better dissipate heat in such a cramped enclosure, but this requires handyman skills that I’m not sure I have. I do have a friend who works at a metal shop and I might, might be able to get him to attempt fashioning something, but no idea if he’d be able to.
The last and most drastic option is to just cut a hole in the metal chassis to give the card more room to breathe. If I went this far I’d obviously do it in a tasteful, decent-looking fashion, but I don’t like doing stuff this drastic to computers that aren’t as common as, say, some beige box from the 90s. Luckily, I wouldn’t need to touch the acrylic, I think, because there’s an air gap between the metal inner chassis and the acrylic outer chassis. I’d think this gap would be significant enough to allow the GF3 to draw a good amount of air and keep itself somewhat cooler. The major concern would be cracking the acrylic, so any way we can avoid having to cut into it is preferred.
While the Cube could clearly run just fine for brief periods of time, the problem I face is, again, this system needs to be able to survive VCF. That’s two back-to-back seven hour days of constantly being on. That’s the end goal here, and damn it, I’m going to try my hardest to get there. I just hope I don’t have to settle for permanently modifying the Cube’s chassis to get there. (And you may act like that’s a horrible thing to do, but in looking at the CubeOwner forums…they’ve done far worse in the name of getting better airflow, ha.)
Part 2 will document the various parts I have on order to attempt to get the Cube to not cook itself. Until then…wish me luck. (And maybe drop me a line if you’ve been down this road and have advice! Social media links are on the top of the page if you’re on desktop (or in the menu on the right if you’re on mobile).